
M365 Device Management Reporting
- averyariford
- Feb 11, 2024
- 5 min read
Generate Efficient Reports within Microsoft 365 Device Management
Goal & Purpose of Instructions
Global administrators, field technicians, and administrative technical support staff are often tasked with knowing the ins and outs of their mobile device management data. This data includes how many devices are enrolled with the organization if any devices are out of compliance, and sundry information regarding the status of these devices. On top of needing access to all this information, you must keep this data organized in spreadsheets for daily upkeep and auditing purposes. You could ask the users themselves for the tags affiliated with their devices. If they have any storage space left on their devices, this is highly time-consuming for the technical staff and users.
If your organization utilizes Microsoft for its management portal, a more straightforward solution would be to use the custom device inventory report-generating tool in Microsoft 365 Device Management, otherwise known as Microsoft’s MDM, Endpoint Manager, or just plain Intune. You may be having some difficulty understanding how to generate these reports, how to export them, and what all that information on the reports even means. Many technical employees get hung up on all the different column options to include in their reports, as they aren’t sure what is relevant to their organization or not, but this report also includes a breakdown of those daunting options. These instructions will guide you through this process step by step and ensure you can be as efficient as possible when logging data for end-user devices within your organization.
Needed Materials & Permissions
A workstation, tablet, or laptop that is equipped with a functional browser and spreadsheet program, i.e., Google Chrome and Microsoft Excel.
Access to Microsoft Intune. Some organizations make this access available to all technical staff, while some restrict access to global or system administrators.
A solid internet connection.
Preparing to Generate the Report

1. The primary step is accessing https://endpoint.microsoft.com/ from your browser. You will be prompted to sign into the portal with your Microsoft Azure credentials. These credentials can be your personal login information or a broad-use administrator account several people utilize.
2. The primary landing page will appear as the image displayed in Figure 1. Navigate to Manage in the middle column and select All devices.

3. When you reach the All Devices page, choose Columns from the top menu. This will open a list of column options for each enrolled device to view on your report. Listed below are explanations for each column and why they may be vital for you to include in your custom report.
Navigating Column and Filtering Options
a. Device Name: This is the registered name of the user’s workstation, laptop, tablet, cell phone, etc.
b. Managed By: This will typically be listed as MDM, as the Microsoft 365 Mobile Device Management portal is the hub for your organization.
c. Ownership: This displays who oversees the device. This will typically be listed as corporate for a company-issued device, but it is possible that the device may be listed as Personal or Unknown.
d. Compliance: This displays whether the listed device meets the compliance regulations of the organization. Some possible options for this column may be listed as Compliant, Not Compliant, or Not Evaluated.
e. Compliance Grade Period Expiration Date: This displays how long a device has until it is marked as non-compliant for failing to meet compliance standards.
f. OS: This displays the operating system of the device. Some possible options for this may be Windows, Mac, Android, or IOS.
g. OS Version: This displays the current installation version of the device’s operating system. This is handy for determining if many devices within the company are running on outdated operating platforms, which could be causing performance issues for the users.
h. Device Action: Endpoint Manager has options for managing end users' devices remotely like tracking or factory resetting them. This column option will allow you if there is an action being performed.
i. Device State: This may display if the device is in a hybrid Azure state or is compliant within AD.
j. Email Address: This displays the email address that the device was enrolled with.
k. Last Check-In: This often displays when the user last signed into their device or successfully authenticated themselves.
l. Enrollment Date: This displays when the device was fully enrolled to the organization’s MDM.
m. IMEI: This lists the device’s IMEI address, which is a crucial tag that must be included on data reports to assist with issues like tracking the device or working with the manufacturer on warranty.
n. EAS Activated: EAS stands for Exchange ActiveSync. This function allows users to sign into their email accounts while working offline and still keep their information synced.
o. EAS Activation ID: If EAS is enabled, the activation ID is available for documentation purposes.
p. Azure AD Registered: This will display whether the device is workplace joined. This allows users to sign into their devices without an organization email address or account, so this setting often applies to personal devices.
q. Registration State: This will display if the device is registered with the company.
r. Jailbroken: This would display if the user violated their OS conditions in any way, which can be a security risk.
s. Supervised: Supervisor mode is a way for admins to exercise even more control on a user’s device, like changing the device name or locking down network sharing, and this option will display if this mode is enabled.
The micro-options listed as column options for the generated reports, such as Serial Number and Phone Number, are a bit more self-explanatory, so this guide won’t delve too deeply into them. Don’t fret if you need extra help with them; Microsoft has several articles documenting Intune and its features.

4. Now that you better understand the different column options, you will find that you also have a filtering option by choosing Filter. The filtering options comprise a shortened list of the categories listed for the columns, such as the compliance state and OS information. Unlike the columns, filtering options allow you to choose any category status and specifics you want to include in your report. Choose the drop-down menus on each tab, choose any specifics you may need for your report, and exclude any irrelevant to you.
Exporting the Report to Excel (or Other Spreadsheet Program)
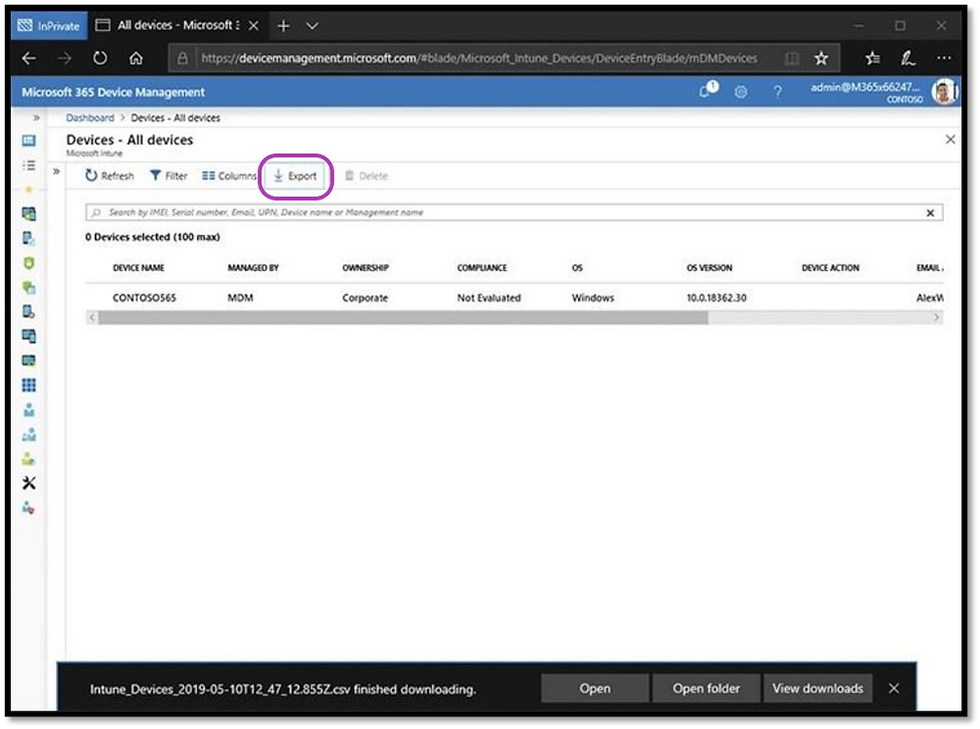
5. Once you are finished with any filtering options you have chosen, venture to the Export tab. You will receive a prompt from your operating system to save the file as a CSV file, which can then be opened in Excel. Every column you have selected will show as a column in Excel. All the organization’s devices will be neatly filed and ready for your review.
Comments